Il problema della schermata nera su Windows 10 si verifica in genere dopo un aggiornamento o quando un aggiornamento automatico di Windows installa gli aggiornamenti sul sistema. Poiché questa schermata nera è molto probabilmente un problema hardware (GPU), avremo bisogno di valutare e risolvere varie impostazioni per diagnosticare e risolverlo.

Al giorno d'oggi, i PC stanno diventando sempre più avanzati con più schede grafiche per un utilizzo intenso. Quindi, se si dispone di una scheda grafica diversa dal controller grafico integrato di Intel , probabilmente si verificherà un problema di avvio con schermo nero . A volte, Windows lo considera come se ci fossero due monitor collegati al sistema. Quindi, Windows carica il segnale di uscita su una schermata nera.
Prima di addentrarci in una vasta risoluzione dei problemi; dobbiamo controllare alcune impostazioni di base. Se utilizzi più monitor, disconnettiti / ricollegati ed esegui il test con lo schermo principale. Se questo risolve il problema; sei fortunato. In caso contrario, procedere con i passaggi seguenti:
Metodo 1: risolvilo alla cieca
Questo metodo consiste nel risolvere il problema alla cieca poiché non puoi vedere nulla su uno schermo nero.
- Quando Windows si blocca sullo schermo nero, attendi che il cursore del mouse bianco appaia sullo schermo. Puoi verificarne la presenza muovendo il tappetino del mouse.
- Dopo che il cursore è apparso sullo schermo, premere la barra spaziatrice sulla tastiera e premere una volta il tasto ctrl sulla tastiera. Inserisci ciecamente la password di accesso o il codice PIN (non puoi vedere sullo schermo nero) . Si accederà a Windows utilizzando le tue credenziali.
Se non riesci a vedere il desktop dopo aver effettuato l'accesso al tuo account e sei bloccato sullo schermo nero, premi Win + P + Freccia giù (due volte) sulla tastiera e inserisci di nuovo i dettagli.
Metodo 2: ciclo di alimentazione
Se si tratta di un laptop con una batteria rimovibile dall'utente, allora;
- Togli la batteria.
- Scollegare l'adattatore di alimentazione.

- Tieni premuto il pulsante di accensione per 10 secondi
- Rilascia il pulsante di accensione.
- Ricollega il caricabatterie e prova ad accenderlo.

Verifica e verifica se il problema è stato risolto; in caso contrario, passare al metodo 4
Metodo 3: disattivare l'avvio rapido
Windows 10 viene rilasciato con una funzionalità di avvio rapido. Come suggerisce il nome, consente un avvio rapido del sistema operativo in modo da poter riprendere il lavoro o giocare rapidamente.
NOTA: la funzione Avvio rapido funziona solo quando si esegue un arresto e quindi si accende il sistema, non si applica quando si esegue un riavvio .
Per disattivare l'opzione di avvio rapido; Segui questi passiAvvia utilizzando il supporto di installazione di Windows 10. Potrebbe essere necessario modificare l'ordine di avvio dal BIOS.
vedere: come creare un supporto Windows 10 avviabile
- Fai clic su Ripara il tuo computer in basso
- Fare clic su Risoluzione dei problemi
- Fare clic su Opzioni avanzate
Nota: se questo metodo non funziona, prova a fare clic su "Torna alle versioni precedenti" e segui le istruzioni sullo schermo.
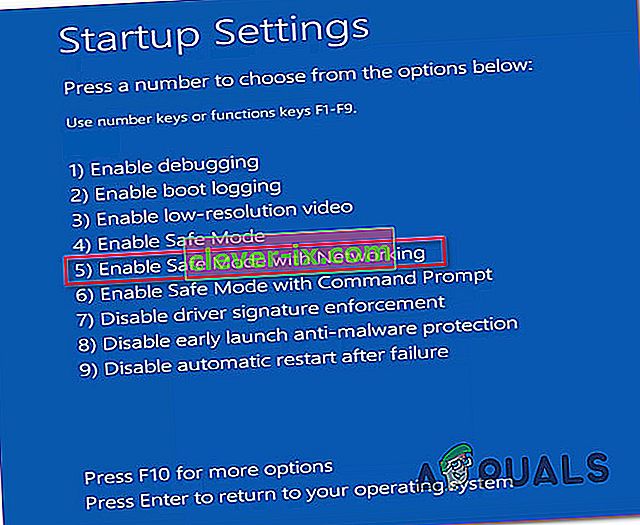
- Fare clic su Impostazioni di avvio
- Fare clic su Riavvia
- Seleziona Modalità provvisoria con rete
- Quando il PC inizia a Vai al pannello di controllo ;
- Seleziona Opzioni risparmio energia ; Seleziona Scegli cosa fanno i pulsanti di accensione alla tua sinistra.


Qui, scorri verso il basso e trova l' opzione Avvio rapido e deselezionala .

Metodo 4: disinstallare la scheda video
Quando vedi la schermata nera:
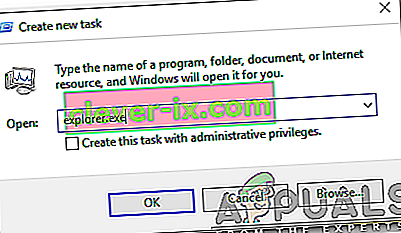
- Tieni premuti i tasti CTRL + ALT + CANC insieme per vedere se viene visualizzato Task Manager. In tal caso, fai clic su File -> Nuovo -> e digita explorer.exe
- Se apre la finestra di Explorer; effettuare il login e disinstallare il software antivirus / la scheda grafica, quindi reinstallare.
Nota: puoi anche scegliere di disabilitare temporaneamente l'Antivirus invece di disinstallarlo.
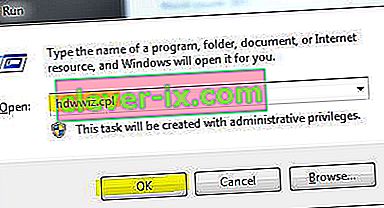
- Per disinstallare la scheda grafica / schermo; se CTRL + ALT + CANC ha successo e vedi la finestra di Explorer, tieni premuto il tasto Win e premi R.
- Digita hdwwiz.cpl e fai clic su OK
- Annotare il nome della scheda video;
- Espandi Schede video -> Seleziona Disinstalla


Dopo che è stato disinstallato, vai al sito del produttore per scaricare il driver più recente. Riavvia e TEST
Metodo 5: ripristina il sistema alle impostazioni di fabbrica
Questo metodo cancellerà tutti i tuoi dati e inserirà / installerà il sistema operativo originale fornito con il tuo computer. Poiché c'è la corruzione; e se i dati non sono importanti, possiamo ripristinarli alle impostazioni di fabbrica, quindi eseguire un'installazione pulita di Windows. L'opzione di aggiornamento potrebbe non essere più disponibile dopo questo.
Fare riferimento al manuale del sistema per le istruzioni di ripristino di fabbrica.
Metodo 6: riavvia semplicemente il computer
Alcuni degli utenti di Windows 10 che hanno sofferto del problema dello schermo nero in passato riferiscono che semplicemente spegnere il computer utilizzando il pulsante di accensione e riavviarlo di nuovo ha fatto il trucco e ha eliminato il problema per loro. Per quanto bizzarro possa sembrare, vale sicuramente la pena provare questa soluzione.
Metodo 7: aggiorna i driver della tua GPU alle versioni più recenti
Windows 10 è un grande passo avanti rispetto alle versioni precedenti di Windows, motivo per cui tutti i produttori di GPU hanno dovuto creare driver completamente nuovi progettati specificamente per il nuovo sistema operativo. Non avere i driver aggiornati compatibili con Windows 10 sul tuo computer è un'altra cosa che può far sì che il tuo computer sia influenzato dal problema dello schermo nero. Se nel tuo caso ci sono driver obsoleti dietro il problema dello schermo nero, tutto ciò che devi fare è visitare il sito Web ufficiale del produttore del tuo computer o del produttore della tua GPU e scaricare i driver più recenti per la tua GPU (dovrebbero essere disponibili in entrambe le posizioni). Assicurati che i driver scaricati siano progettati specificamente per Windows 10 per garantire il successo di questa soluzione.
Metodo 8: cambia la luminosità del tuo laptop su qualsiasi cosa tranne il 100%
Sui laptop con schede grafiche di fascia alta e aggiornati a Windows 8, il problema dello schermo nero si presenta spesso quando vengono collegati a una presa di corrente CA. In tal caso, è sufficiente aprire il menu Start , cercare le impostazioni di alimentazione avanzate , aprire le impostazioni di alimentazione avanzate e modificare la luminosità dello schermo del laptop quando è collegato a qualsiasi cosa tranne il 100% (anche il 99% lo farà) eliminerà lo schermo nero problema.
Metodo 9: se hai due schede grafiche, disabilita quella integrata
Una soluzione decente per il problema dello schermo nero per le persone i cui computer dispongono di due schede grafiche - la scheda grafica integrata fornita con il computer e la scheda grafica che hanno aggiunto ad essa (come una scheda grafica Nvidia o AMD) - è semplicemente disabilitare la scheda grafica integrata. Apparentemente, avere due schede grafiche su un computer Windows 10 può provocare uno scontro che di conseguenza fa nascere il problema dello schermo nero. In tal caso, è sufficiente accedere a Gestione dispositivi , espandere la sezione Schede video, fare clic con il pulsante destro del mouse sulla scheda grafica integrata e fare clic su Disattiva per risolvere il problema.
If you do not see your onboard graphics card in the Display adapters section, click on View in the top left of the Device Manager dialog and click on Show hidden devices. This will make your onboard graphics card (or, in some cases, cards) visible, and you can then right-click on it and click on Disable.
Method 10: Refresh your computer
The infamous black screen issue on Windows 10 can also be fixed by simply refreshing your computer. Refreshing your computer has almost entirely the same effect as resetting it to factory settings, with the exception of the fact that a refresh only deletes installed programs and applications and keeps your personal data whereas a reset gets rid of everything on your computer. To refresh a Windows 10 computer, you need to:
- Open the Start Menu.
- Click on Settings.
- Out of the array of different options provided, click on Update & Security.

- Click on Recovery in the left pane.
- In the right pane, click on the Get started button under the Reset this PC
- When provided with a choice to either keep your files or remove everything, click on Keep my files.

Method 11: Correcting User Shell
In some cases, the User shell might be preventing the user from being able to boot safely into their computer. In certain situations, the user shell configuration inside the registry might get corrupted due to which this black screen issue can occur. Therefore, in this step, we will be correcting this user shell entry. In order to do that, follow the steps below.
- Boot your computer and wait for the black screen to appear.
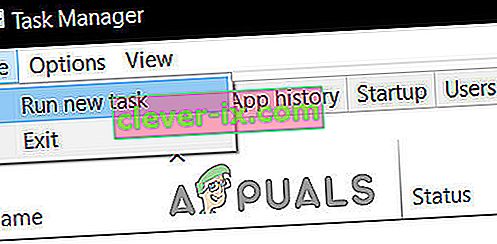
- Press “Ctrl” + “Alt” + “Del” and select the “Task Manager” option.
- Click on the “File” option on the top left of the task manager and select “Run New Task” from the list.
- Type in “regedit” and press “Enter” to open it.
Computer\HKEY_LOCAL_MACHINE\SOFTWARE\Microsoft\Windows NT\CurrentVersion\Winlogon
- Double click on the “Shell” entry on the right pane.
- Type in “Explorer.exe” in the Value data field and save your changes.
- Press “Ctrl” + “Alt” + “Del” again and click on the “Power Options” icon on the lower right side.

- Select “Restart” from the menu and wait for your computer to be restarted.
- Check to see if the issue persists after restarting the computer.


Method 12: Stopping Service
There is a specific service that prevents the computer from being able to function properly in some cases and stopping it can prevent the black screen issue from occurring. Therefore, in this step, we will be stopping this service. For that:
- Press “Ctrl” + “Alt” + “Del” and select the “Task Manager” option.
- Click on the “File” option on the top left of the task manager and select “Run New Task” from the list.
- Type in “services.msc” and press “Enter” to open it.
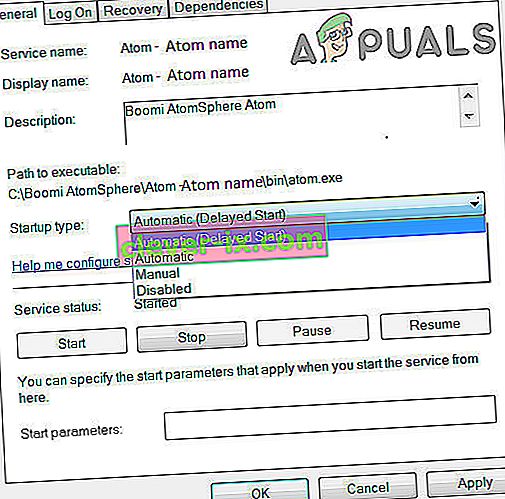
- Scroll through this list and look for the “RunOnce32.exe” or the “RunOnce.exe” entry. Also, do this same process for the “App Readiness” Service.
- Right-click on it and select “Stop”.
- Double click on it and change its startup type to “Disabled”.
- Wait for the service to be stopped completely and restart your computer.
- Check to see if the issue persists after stopping it completely.

Method 13: Renaming Files
In certain cases, the files in some Windows’ folders might have gotten corrupted due to which this black screen issue is being triggered. Therefore, in this step, we will be renaming these files and then check to see if the issue still persists.
- Press “Ctrl” + “Alt” + “Del” on the black screen.
- Click on the “Task Manager” option and then select “File”.
- Select the “Run New Task” option and then type in “cmd”.
- Type in the following command one by one for each file to rename it.
rename “(File Path) (File Name)” “(New Name)”
- Rename the following files to anything except their original names.
C:\ProgramData\Microsoft\Windows\AppRepository\StateRepository-Deployment C:\ProgramData\Microsoft\Windows\AppRepository\StateRepository-Deployment C:\ProgramData\Microsoft\Windows\AppRepository\StateRepository-Deployment C:\ProgramData\Microsoft\Windows\AppRepository\StateRepository-Machine C:\ProgramData\Microsoft\Windows\AppRepository\StateRepository-Machine C:\ProgramData\Microsoft\Windows\AppRepository\StateRepository-Machine
- Check to see if the issue persists after making these changes.
- If it still does, try the following code to just fix it.
cd "ProgramData\Microsoft\Windows\AppRepository" ren "StateRepository-Deployment.srd" "StateRepository-Deployment-Corrupted.srd" ren "StateRepository-Deployment.srd-shm" "StateRepository-Deployment-Corrupted.srd-shm" ren "StateRepository-Deployment.srd-wal" "StateRepository-Deployment-Corrupted.srd-wal" ren "StateRepository-Machine.srd" "StateRepository-Machine-Corrupted.srd" ren "StateRepository-Machine.srd-shm" "StateRepository-Machine-Corrupted.srd-shm" ren "StateRepository-Machine.srd-wal" "StateRepository-Machine-Corrupted.srd-wal"
- Check to see if the issue persists.
Method 14: Replacing Profile Cache
It is possible the Profile cache for your current user account has either gone missing from some locations or it has been corrupted in certain locations due to which this issue is being triggered. Therefore, in this step, we will be replacing this profile cache after copying it from a location. For that:
- Create a new user account before doing so and log into that.
- Restart your computer in safe mode.
- Log in to your new profile.
- Navigate to the following location and copy the folder named “caches”.
C:\Users\{working-user-profile-name}\AppData\Local\Microsoft\Windows\Caches - Paste this folder in the following location.
C:\Users\{broken-user-profile-name}\AppData\Local\Microsoft\Windows\Caches. - Check to see if the issue persists.
Follow the onscreen instructions and dialogs, and once you are done, your computer will have been refreshed and the black screen issue will be no more.
You can further try to:
- Boot your computer in safe mode and check if the issue persists over there. This will help you to isolate these issues from a specific app that is causing it.
- Press “Windows” + “P” to switch displays that might fix this.
- Update your Bios
- Disconnect the Second monitor
- Try to use an HDMI cable for connection instead of a DVI or VGA one.
- When in the black screen, press the “Windows’ + “Ctrl” + “Shift” + “B” keys to refresh the Graphics Driver.
- You can also try to perform a Startup Repair.
- Try to create a new user account using the last methods listed in this article.
- Eseguire una scansione SFC e DISM.


